# 什么是数据响应式
在上古(jq)时代,比如我们要渲染一个列表是,我们需要借助DOM操作(jq)和模板引擎(underscore…),结合数据来完成,非常的繁琐。有了 vue 的之后,借助数据响应式系统,只需要 <div v-for=“item in list”> 就可以完成。这个简单的demo, 体现了 Vue.js 一个核心思想就是数据驱动。所谓数据驱动,是指视图是由数据驱动生成的,我们对视图的修改,不会直接操作 DOM,而是通过修改数据。接下来我们,深入源码分析这一部分。这个过程大致分为三个部分让数据变成响应式、依赖收集 和 派发更新。
# 数据响应式整体原理
这里我们借助官网的一张图,如下图:

在渲染时,vm._update()方法重新渲染,这个会 touch 到模板中的数据,会发响应数据的 get 函数,收集本次渲染的依赖。收集依赖和更新派发都是基于 Watcher 观察者。在我们给某些数据进行复制操作时,会触发响应数据的 set 函数,set 会调用 dep.notify(),通知依赖它的 watcher, 触发试图更新。
总之数据驱动的核心,就是通过 Object.defineProperty 方法去重写数据的get和set属性描述符,让数据在被渲染时把所有用到自己的订阅者存放在自己的订阅者列表中,当数据发生变化时将该变化通知到所有订阅了自己的订阅者,达到重新渲染的目的。
# 让数据变成响应式
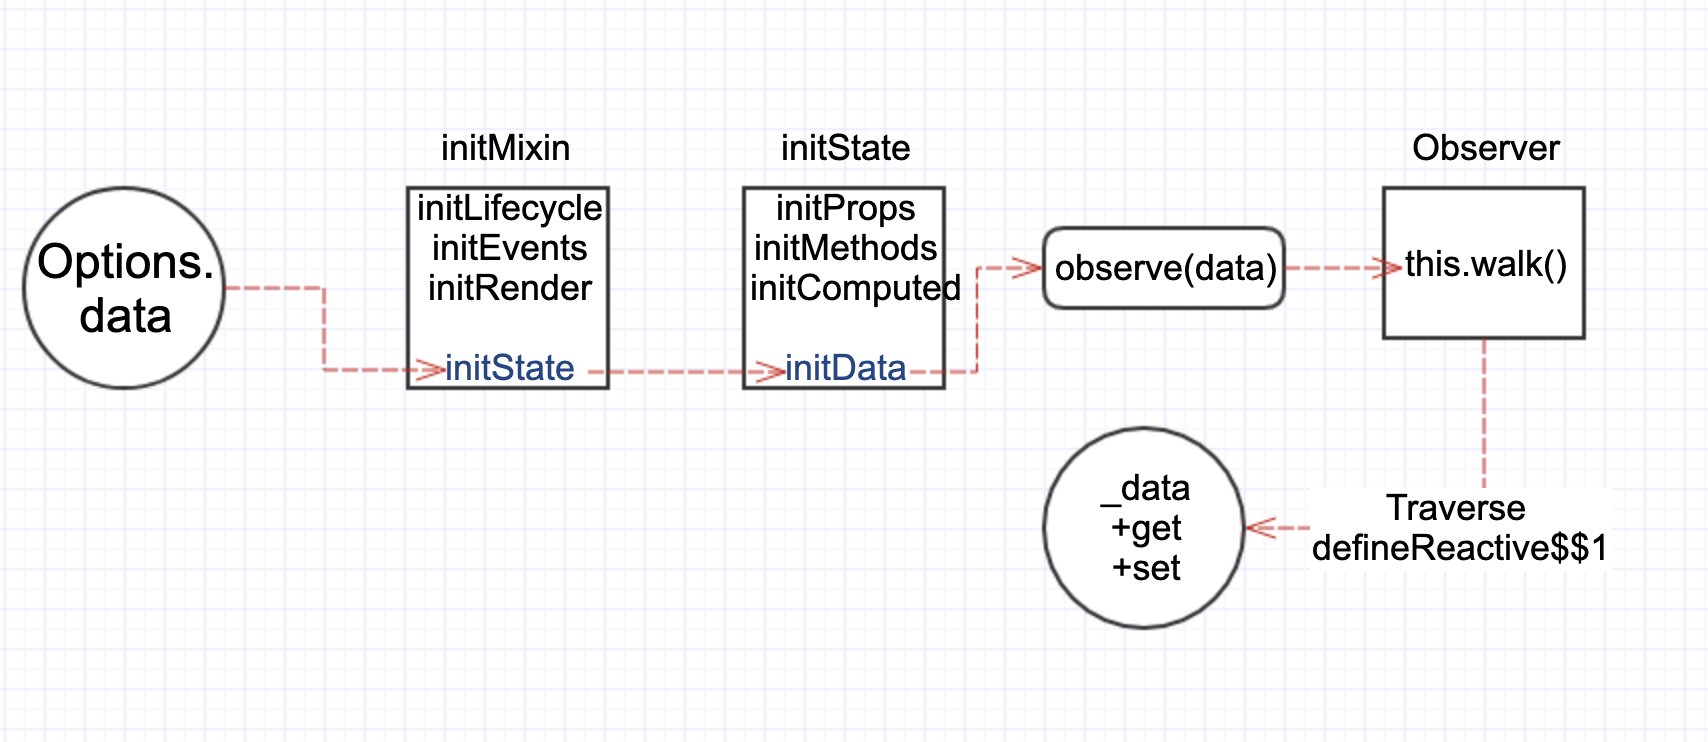
Vue 的数据响应式原理是 ES5 内置对象方法 Object.defineProperty(一些浏览器上不支持的,IE8: 大家都看我干吗?) 来实现的。这个方法的作用是在一个对象上定义一个新属性,或者修改一个对象的现有属性。 (opens new window),在新的vue3当前是使用了 ES6 的 Proxy代替了它。接下来我们理清整个响应式的初始化链路,如下图:
# Vue的初始化
function Vue(options) {
    if (!(this instanceof Vue)) {
        warn('Vue is a constructor and should be called with the `new` keyword');
    }
    this._init(options);
}

initMixin(Vue);
stateMixin(Vue);
eventsMixin(Vue);
lifecycleMixin(Vue);
renderMixin(Vue);
// ...
2
3
4
5
6
7
8
9
10
11
12
13
上述的代码中,我们可以看到 new Vue 时,实际上调用了 this._init(options) 这个方法,_init 这个方法是在 initMixin(Vue)时,添加到 Vue.prototype 上的。_init 中有调用了一堆初始化的方法,关于响应式的主要是在 initState 中。
function initState(vm) {
    vm._watchers = [];
    var opts = vm.$options;
    if (opts.props) { initProps(vm, opts.props); }
    if (opts.methods) { initMethods(vm, opts.methods); }
    if (opts.data) {
        initData(vm);
    } else {
        observe(vm._data = {}, true /* asRootData */ );
    }
    if (opts.computed) { initComputed(vm, opts.computed); }
    if (opts.watch && opts.watch !== nativeWatch) { initWatch(vm, opts.watch); }
}
2
3
4
5
6
7
8
9
10
11
12
13
# 将options.data 变为响应式
在上述的 initState 方法中,主要是对 props,methods,data,computed,watch进行了相关初始化操作,除了 methods,其他都会变成响应式。我们主要看一下 initData 做了哪些事情。
function initData(vm) {
    var data = vm.$options.data;
    data = vm._data = typeof data === 'function' ?
        getData(data, vm) :
        data || {};
    if (!isPlainObject(data)) {
        data = {};
        warn(
            'data functions should return an object:\n' +
            'https://vuejs.org/v2/guide/components.html#data-Must-Be-a-Function',
            vm
        );
    }
    // proxy data on instance
    var keys = Object.keys(data);
    var props = vm.$options.props;
    var methods = vm.$options.methods;
    var i = keys.length;
    while (i--) {
        var key = keys[i]; {
            if (methods && hasOwn(methods, key)) {
                warn(
                    ("Method \"" + key + "\" has already been defined as a data property."),
                    vm
                );
            }
        }
        if (props && hasOwn(props, key)) {
            warn(
                "The data property \"" + key + "\" is already declared as a prop. " +
                "Use prop default value instead.",
                vm
            );
        } else if (!isReserved(key)) {
            proxy(vm, "_data", key);
        }
    }
    // observe data
    observe(data, true /* asRootData */ );
}
2
3
4
5
6
7
8
9
10
11
12
13
14
15
16
17
18
19
20
21
22
23
24
25
26
27
28
29
30
31
32
33
34
35
36
37
38
39
40
上述的 initData 主要是对 $options.data 处理,主要有两个功能:
- 将
data挂载到vm示例上,同时检查data中的key是否与props和methods中的key有冲突 observe(data, true),使用observe方法将data成为响应式。
- 检查
data属性是否是一个函数,对于组件来说 - 遍历过程将会使用
hasOwn(methods, key)、hasOwn(props, key)、!isReserved(key)方法对该数据是否占用保留字、是否与props和methods中的属性重名进行判断,然后调用proxy方法将其代理到Vue实例上。
如果 data 中的属性与 props、methods 中的属性重名,那么在 Vue 实例上调用这个属性时的优先级顺序是 props > methods > data
最后对每一个 data 中的属性调用 observe 方法,该方法的功能是赋予 data 中的属性可被监测的特性。observe 方法主要是调用 Observer 类构造方法,将每一个 data 中的 value 变成可观察、响应式的:
 var Observer = function Observer(value) {
    this.value = value;
    this.dep = new Dep();
    this.vmCount = 0;
    def(value, '__ob__', this);
    if (Array.isArray(value)) {
        if (hasProto) {
            protoAugment(value, arrayMethods);
        } else {
            copyAugment(value, arrayMethods, arrayKeys);
        }
        this.observeArray(value);
    } else {
        this.walk(value);
    }
}
2
3
4
5
6
7
8
9
10
11
12
13
14
15
16
初始化 Observer,有一下几个步骤:
- 针对当前的数据对象新建一个订阅器;
- 为每个数据的
value都添加一个__ob__属性,该属性不可枚举并指向自身; - 针对数组类型的数据进行单独处理(包括赋予其数组的属性和方法,以及
observeArray进行的数组类型数据的响应式); this.walk(value),遍历对象的key调用defineReactive方法;
defineReactive 是真正为数据添加 get 和 set 属性方法的方法,它将 data 中的数据定义一个响应式对象,并给该对象设置 get 和 set 属性方法,其中 get 方法是对依赖进行收集, set 方法是当数据改变时通知 Watcher 派发更新。
# 依赖收集
为什么要做依赖收集,因为不知道是不是所有声明的数据都会在页面渲染时用到。基于这样的场景,所以在 touch 页面渲染会触发相关数据的 get 方法,通过 get 方法进行依赖的收集。
我们来看一下 defineReactive$$1 中,对 value 的 get属性描述符是如何定义的。
get: function reactiveGetter() {
    var value = getter ? getter.call(obj) : val;
    if (Dep.target) {
        dep.depend();
        if (childOb) {
            childOb.dep.depend();
            if (Array.isArray(value)) {
                dependArray(value);
            }
        }
    }
    return value
},
2
3
4
5
6
7
8
9
10
11
12
13
在触发 get 函数时,调用了 dep.depend(),这是依赖收集的过程,或者是说订阅者添加依赖订阅,流程如下图:

首先这里我们要搞清楚谁是依赖,谁是订阅,watcher类 就是依赖,因为它依赖于数据,Dep类就是订阅,会将依赖放在自己的订阅者subs列表中管理。
这里有点抽象,我们来举个🌰:
假如当前渲染的组件 User ,它的template模板 name,依赖了自己的 data 中的 name。User组件渲染会产生的 watcher, 通过 pushTarget 方法,赋值在 Dep.target 上, 由 name实例化的订阅器在调用dep.depend,其实调用了 watcher.addDep(dep) => dep.addSub(watcher),后面这一步,我们可以看到,name订阅器将 User依赖(watcher)添加到了自己的订阅者列表中,这样就完成了依赖收集的过程了。
# Dep 订阅器
上面只是简单介绍了Dep 参与了数据依赖的过程,具体来看看Dep类是如何实现的。
var Dep = function Dep() {
    this.id = uid++;
    this.subs = [];
};
Dep.prototype.addSub = function addSub(sub) {
    this.subs.push(sub);
};
Dep.prototype.removeSub = function removeSub(sub) {
    remove(this.subs, sub);
};
Dep.prototype.depend = function depend() {
    if (Dep.target) {
        Dep.target.addDep(this);
    }
};
Dep.prototype.notify = function notify() {
    var subs = this.subs.slice();
    if (!config.async) {
        subs.sort(function (a, b) {
            return a.id - b.id;
        });
    }
    for (var i = 0, l = subs.length; i < l; i++) {
        subs[i].update();
    }
};
2
3
4
5
6
7
8
9
10
11
12
13
14
15
16
17
18
19
20
21
22
23
24
25
26
Dep类中主要与三个属性:id,subs,target,分别表示当前订阅器的标识,订阅者列表以及当前的订阅者。此外还提供一些添加,删除,通知订阅者的方法。
这里重点说明一点 Dep.target,指的是当前全局的唯一订阅者。这个订阅者是有一个订阅者栈 targetStack,当某一个组件执行到某个生命周期的 hook 时(例如 mountComponent),会将当前目标订阅者 target 置为这个 watcher,并将其压入 targetStack 栈顶。
所以这里很显然 Dep.target.addDep(this) 就是 watcher.addDep(dep),我们来看看 Watcher 类中的这个方法做了哪些事情。
Watcher.prototype.addDep = function addDep(dep) {
    var id = dep.id;
    if (!this.newDepIds.has(id)) {
        this.newDepIds.add(id);
        this.newDeps.push(dep);
        if (!this.depIds.has(id)) {
            dep.addSub(this);
        }
    }
}
2
3
4
5
6
7
8
9
10
newDepIds 是当前数据依赖 dep 的 id 列表,newDeps 是当前数据依赖 dep 列表,depsId 则是上一个 tick(疑问:tick是什么,后面我们会解释的) 的数据依赖的 id 列表。在这里可以简单理解为 User又添加其他的数据依赖,比如 family,所以之前的数据订阅和现在的数据订阅会有所不同,如果之前有了就不必添加到这个数据的订阅者列表了。
# Watcher.target 何时产生的
上述的过程描述中我们一定会疑惑 Watcher.target 是何时挂在的。这里主要涉及到了 mountComponent 这个方法。组件挂载时会调用此方法。
function mountComponent( vm, el, hydrating ) {
    vm.$el = el;
    if (!vm.$options.render) {
        // ...
    }
    callHook(vm, 'beforeMount');
    var updateComponent;
    /* istanbul ignore if */
    if (config.performance && mark) {
        updateComponent = function () {
            // 初次渲染,生成 vNode
        };
    } else {
        updateComponent = function () {
            // 更新渲染
            vm._update(vm._render(), hydrating);
        };
    }
    new Watcher(vm, updateComponent, noop, {
        before: function before() {
            if (vm._isMounted && !vm._isDestroyed) {
                callHook(vm, 'beforeUpdate');
            }
        }
    }, true /* isRenderWatcher */ );
    // ...
    return vm
}
2
3
4
5
6
7
8
9
10
11
12
13
14
15
16
17
18
19
20
21
22
23
24
25
26
27
28
updateComponent 函数会调用是渲染真实DOM的方法,所以在生命周期beforeMount后调用。在 watcher实例化时,会依据入参lazy默认值(默认值是 false)来调用 this.get()。
var Watcher = function Watcher( vm, expOrFn, cb, options, isRenderWatcher ) {
    this.vm = vm;
    if (isRenderWatcher) {
        vm._watcher = this;
    }
    vm._watchers.push(this);
    // options
    if (options) {
        this.deep = !!options.deep;
        this.user = !!options.user;
        this.lazy = !!options.lazy;
        this.sync = !!options.sync;
        this.before = options.before;
    } else {
        this.deep = this.user = this.lazy = this.sync = false;
    }
    this.cb = cb;
    this.id = ++uid$2; // uid for batching
    this.active = true;
    this.dirty = this.lazy; // for lazy watchers
    this.deps = [];
    this.newDeps = [];
    this.depIds = new _Set();
    this.newDepIds = new _Set();
    this.expression = expOrFn.toString();
    // parse expression for getter
    if (typeof expOrFn === 'function') {
        this.getter = expOrFn;
    } else {
        this.getter = parsePath(expOrFn);
        // ...
    }
    this.value = this.lazy ? undefined : this.get();
};
Watcher.prototype.get = function get() {
    pushTarget(this);
    // ...
    try {
        value = this.getter.call(vm, vm);
    } catch (e) {
        // ...
    } finally {
        // "touch" every property so they are all tracked as
        // dependencies for deep watching
        if (this.deep) {
            traverse(value);
        }
        popTarget();
        this.cleanupDeps();
    }
};
// ...
Dep.target = null;
var targetStack = [];

function pushTarget(target) {
    targetStack.push(target);
    Dep.target = target;
}
function popTarget() {
    targetStack.pop();
    Dep.target = targetStack[targetStack.length - 1];
}
2
3
4
5
6
7
8
9
10
11
12
13
14
15
16
17
18
19
20
21
22
23
24
25
26
27
28
29
30
31
32
33
34
35
36
37
38
39
40
41
42
43
44
45
46
47
48
49
50
51
52
53
54
55
56
57
58
59
60
61
62
63
这里有一个闭包变量 targetStack 来存储 watcher,pushTarget把当前的 watcher 压入 targetStack 栈中。并且把当前的订阅器 Dep.target 指向当前的 watcher。此外我们的渲染函数挂载在 watcher.getter 上,this.getter.call(vm, vm) 渲染完成之后,当前的 watcher会被弹出栈,并且会清除所有的订阅器。因为 watcher所依赖的数据,是由模板决定的,模板所要依赖的数据是由用户编写的逻辑决定的,每次重新渲染的时候再去收集数据。如果在数据的订阅器中已经有了当前的 watcher 是不会添加到自己的 subs 订阅者列表中的。
# 派发更新
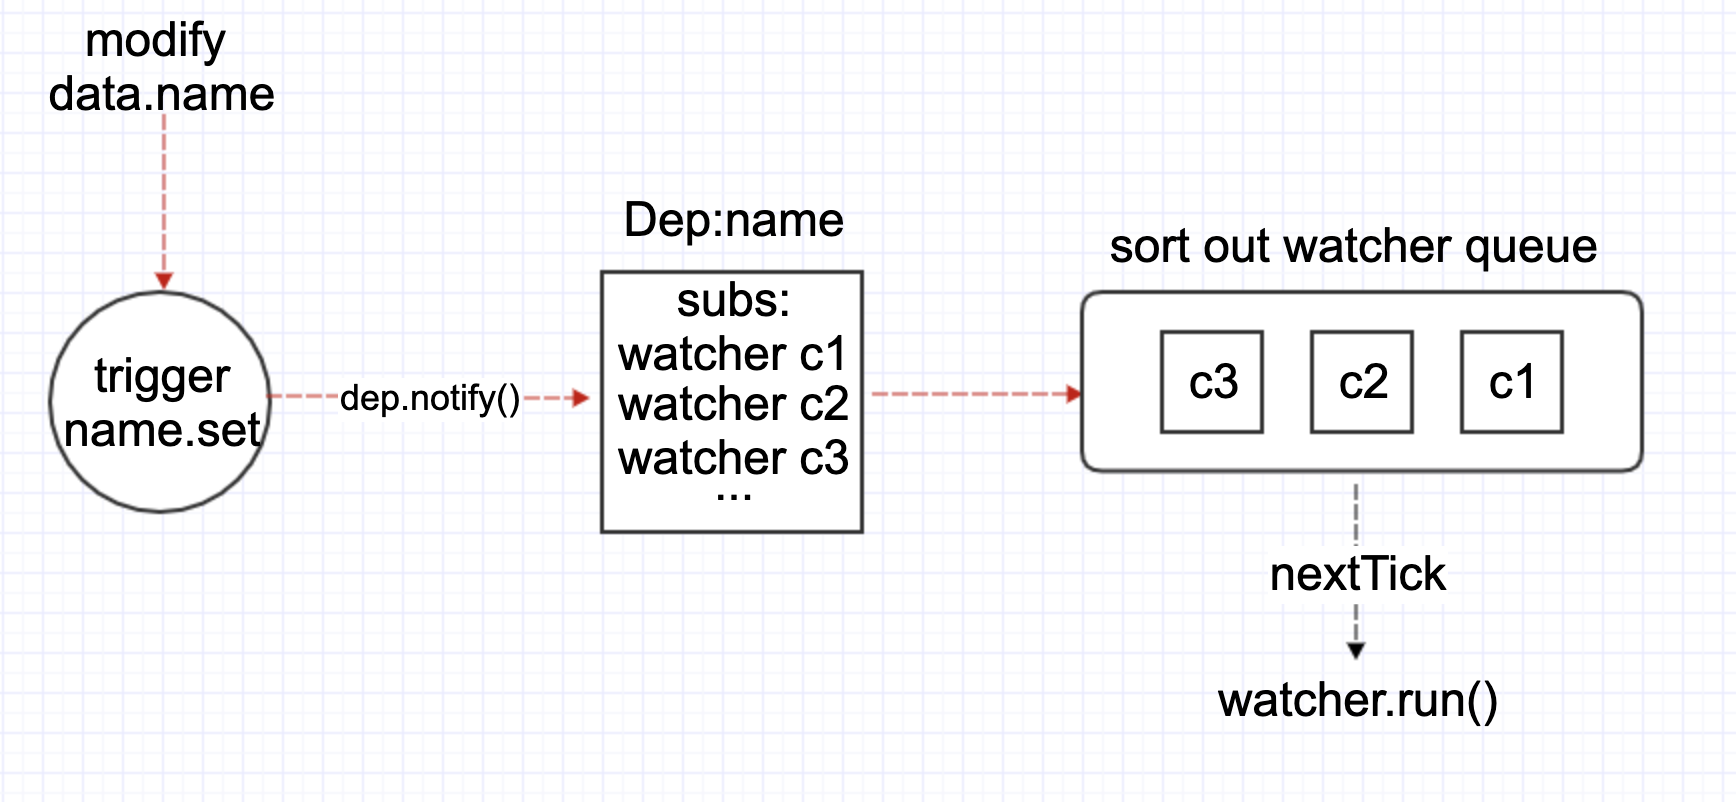
当数据更新时,会触发数据的 set 函数,我们来看看 set 有哪些逻辑。
set: function reactiveSetter(newVal) {
    var value = getter ? getter.call(obj) : val; // 原始值
    if (newVal === value || (newVal !== newVal && value !== value)) {
        return
    }
    if (customSetter) {
        customSetter();
    }
    if (getter && !setter) {
        return
    }
    if (setter) {
        setter.call(obj, newVal);
    } else {
        val = newVal;
    }
    // 如果是对象
    childOb = !shallow && observe(newVal);
    dep.notify();
}
2
3
4
5
6
7
8
9
10
11
12
13
14
15
16
17
18
19
20
- 如果原来的数据存在
getter,getter.call(obj)获取到原始值value,满足newVal === value,则表明数据没有变化,直接return。 - 如果原来的数据存在
setter,setter.call(obj, newVal),调用原值的stter;如果没有,则将newVal赋值给闭包变量val,触发get会返回这个值。 - 派发更新主要是调用了
dep.notify(),我们来看看这部分的具体实现。
Dep.prototype.notify = function notify() {
    var subs = this.subs.slice(); // 浅拷贝数组
    if (!config.async) {
        // 同步需要排序 有小到大
        subs.sort(function (a, b) {
            return a.id - b.id;
        });
    }
    for (var i = 0, l = subs.length; i < l; i++) {
        subs[i].update();
    }
};
Watcher.prototype.update = function update() {
    if (this.lazy) {
        this.dirty = true;
    } else if (this.sync) {
        this.run();
    } else {
        queueWatcher(this);
    }
};
2
3
4
5
6
7
8
9
10
11
12
13
14
15
16
17
18
19
20
21
如果是 config.async 同步的话,需要将订阅者列表排序,然后依次派发更新,即调用 watcher.update()。如果 watcher 是同步,则调用 this.run();,就是同步更新视图。
如果 watcher 内部 this.sync == false,调用 queueWatcher(this)
function queueWatcher(watcher) {
    var id = watcher.id;
    if (has[id] == null) {
        has[id] = true;
        if (!flushing) {
            queue.push(watcher);
        } else {
            // if already flushing, splice the watcher based on its id
            // 如果已经冲洗,则根据其ID拼接观察者
            // if already past its id, it will be run next immediately.
            // 如果已经超过其ID,它将立即立即运行。
            var i = queue.length - 1;
            while (i > index && queue[i].id > watcher.id) {
                i--;
            }
            queue.splice(i + 1, 0, watcher);
        }
        // queue the flush
        if (!waiting) {
            waiting = true;
            // 同步
            if (!config.async) {
                flushSchedulerQueue();
                return
            }
            nextTick(flushSchedulerQueue);
        }
    }
}
2
3
4
5
6
7
8
9
10
11
12
13
14
15
16
17
18
19
20
21
22
23
24
25
26
27
28
29
使用闭包变量has来判断传入的watcher是否已经存在,不存在的话,标识has[id] = true;如果当前的 queueWatcher正在 flushing,判断当前的 watcher队列正在执行的watcher.id和这个比较,如果queue中id大于当前的id,立即插入;没有则插到后面。config.async异步的话,就是用 nextTick 创建一个微任务,执行 flushSchedulerQueue。
function flushSchedulerQueue() {
    currentFlushTimestamp = getNow();
    flushing = true;
    var watcher, id;
    queue.sort(function (a, b) {
        return a.id - b.id;
    });
    // do not cache length because more watchers might be pushed
    // as we run existing watchers
    for (index = 0; index < queue.length; index++) {
        watcher = queue[index];
        if (watcher.before) {
            watcher.before();
        }
        id = watcher.id;
        has[id] = null;
        watcher.run();
        // in dev build, check and stop circular updates.
        // 在开发版本中,检查并停止循环更新。
        if (has[id] != null) {
            // ...
        }
    }
    // keep copies of post queues before resetting state
    var activatedQueue = activatedChildren.slice(); // keep-alive 组件
    var updatedQueue = queue.slice(); // 普通组件
    resetSchedulerState();
    // call component updated and activated hooks
    callActivatedHooks(activatedQueue);
    callUpdatedHooks(updatedQueue);
    // devtool hook
    /* istanbul ignore if */
    if (devtools && config.devtools) {
        devtools.emit('flush');
    }
}
2
3
4
5
6
7
8
9
10
11
12
13
14
15
16
17
18
19
20
21
22
23
24
25
26
27
28
29
30
31
32
33
34
35
36
在 flushSchedulerQueue中,先将 queue 中的 watcher 从小到大排序,然后重置 has[id] = null,循环执行 watcher.run()。在重置清空之前,要考备一份发布队列。然后调用 resetSchedulerState,重置整个任务队列状态。然后调用 UpdatedHooks,通知组件内部已经更新了。至此整个响应式的逻辑已走完整了。哎...,真的多
# 总结
分析源码,不仅了解了整个框架的设计,而且对于作者对细节的把握,有了深刻的认知,可能不能面面俱到,有些细枝末节的东西还没有搞清楚。要知道我们对事物的认知是螺旋式上升波浪式前进的,多几次的接触就会有更多新的领悟,应用也更加灵活。